Article ID: 21925
Overview
This is a guide with known issues that may appear when setting up Auth on IIS, Kestrel or integrating it with Crossfire, along with possible solutions.
How to disable Basic Operators
This is a guide with known issues that may appear when setting up Auth on IIS, Kestrel or integrating it with Crossfire, along with possible solutions.
UPDATE acvscore.dbo.operator

SET enabled = 0

WHERE objectid > 5000

  AND password IS NOT NULL;
How to Enable and use Auth logs
- Go to the Auth install folder and find the Web.config file.
- Set the variable “stdoutLogEnabled” to “True”. This is set to true by default.
- Restart Auth Application Pool on IIS.
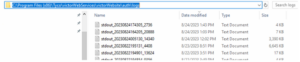
- Verify that after starting Auth the Logs directory is generated inside the Auth install folder found here:
~\Tyco\victorWebServices\victorWebsite\auth\Logs\
Example:
NOTE: Ignore any errors related “APM Server”, since it is not needed when running Auth on IIS
NOTE: Sometimes the logs are not generated completely, if you see at the end of the log that some words or line of text are cut up, shutdown Auth Application Pool on IIS, so that the missing parts in the log entries are completed.
CCURE IQ Web API Logs
Logs for troubleshooting issues between C•CURE IQ and C•CURE IQ Portal and victor Web Services can be found in the
\Tyco\victorWebServices\victorWebsite\Logs\ folder.
Example:

and are available in the api.log file. These logs can be useful in troubleshooting issues and may be requested by JCI support.
Error: “No Auth Service Available” when trying to create an operator with OAuth id
NOTE: This error happens when Crossfire can’t find the Auth service.
Possible Causes:
- Auth hasn’t been integrated with Crossfire correctly.
- Verify that EncryptAuthInfo.exe utility ran with the correct auth information and that the XFAuth.xml was generated inside the %ProgramData%\Tyco\XFire\
- Make sure to restart Crossfire services after running the EncryptAuthInfo.exe utility.
- Auth is not running.
- Verify that Auth is running by navigating to Auth homepage.
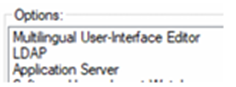
- LDAP was not added to the license
- Make sure that the license used contains LDAP option. This can be done by launching the Admin client and navigating to Help > About. Selecting the License tab and viewing the Options box at the bottom of the screen. See below:
Error: “Issuer name does not match authority” when trying to save operator with auth
NOTE: This error happens when Crossfire canʼt connect to Auth service because information provided on the EncryptAuthInfo was not validated correctly.
- Verify that the information provided in “valid issuer name” filed is correct. It should be one of the following depending on your system setup and version.
|
|
Full Computer Name |
Domain Alias |
|
C•CURE v3.10 – Fresh Install |
https://{Full-Computer-Name}:{Port |
https://{DNS-Alias}:{Port} |
|
Upgraded to C•CURE v3.10 or any version earlier |
https://{Full-Computer-Name}/victorwebservice/auth |
https://{domain-alias}/victorwebservice/auth |
NOTE: Do NOT use localhost in the URL
NOTE: Make sure not to add a “/” at the end of the url
NOTE: The full computer name can be found in the System info section in control panel.
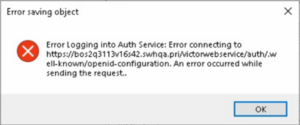
Error: “Unable to send request to /.well-known/openIP-connection” when trying to create operator
NOTE: This error happens when Crossfire canʼt access the Auth metadata.
- Make sure that the SSL Certificate used on the IIS web site hosting Auth, is valid and trusted.
- Verify that information provided in the “valid issuer name” field is correct.
It should be one of the following depending on your system setup and version.
|
|
Full Computer Name |
Domain Alias |
|
C•CURE v3.10 – Fresh Install |
https://{Full-Computer-Name}:{Port |
https://{DNS-Alias}:{Port} |
|
Upgraded to C•CURE v3.10 or any version earlier |
https://{Full-Computer-Name}/victorwebservice/auth |
https://{domain-alias}/victorwebservice/auth |
NOTE: Do NOT use localhost in the URL
Another variation of this error would be: “Error Logging into Auth Service: Error Connecting to…” when trying to create new basic operator from the Client station, after initial login with windows authentication, see previous steps to fix.
How to stop auto-login for Admin or Monitoring Station
The thick clients provide the ability to auto-login the user based on the previous user login. This is done by storing a cookie on the file system. Sometimes, the operator associated with the previous login has been deleted or disabled and this can cause and error when attempting to login. To prevent auto-login for the next client session for the currently logged in Windows user, navigate to the following folder:
C:\Users\{CurrentUser}\AppData\Local\CEF\
For example:
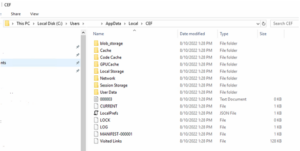
Delete all of the sub folders and files EXCEPT the file names “Visited Links” (the last file in the image below).
Once these folders and files have been deleted, you will be prompted for logon when the thick client is opened. Be aware that after successful login of the thick client, these files will be rewritten with the new cookie information.
Since cookies are stored per Windows user, another option is to launch the client as a different windows user and then turn off the system variable that enables the usage of cookies. Right-click the client icon and select the “Run as” option to run as a different Windows user. You can also log on with a different Windows user to facilitate the same functionality.
Error: “Unable to log in, Crossfire indicated a fault: Unable to securely reach https://.. when attempting to log into thick client
NOTE: The following solution is for CCURE versions prior to version 3.10. In version 3.10, the user is no longer required to enter the certificate value since Auth now handles these keys automatically. Also, the functionality of the EncryptAuthInfo.exe utility has been moved to the Server Configuration Application, under the Settings tab.
Once Auth has been configured to run in IIS and a user launches the thick client and attempts to login, you can occasionally get this error message:
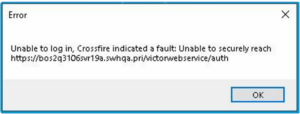
This can cause confusion since placing the URL into the browser will successfully bring you to the Auth landing page. This error generally indicates a mismatch with the certificate entered into EncryptAuthInfo.exe. The most common cause appears to be when the user selects the certificate key from appsettings.json and accidentally selects either the beginning or trailing double-quote. To resolve this problem:
- Copy the certificate value again ensuring to only select the data WITHIN the quotes.
- Run EncryptAuthInfo.exe.
- Select only the “Update?” checkbox for the certificate.
- Enter the new value and save it.
- Restart the Crossfire.
HTTP Error 500.19 – Internal Server Error (only for v3.00.1)
If you receive the following error while attempting to access the Auth URL in the browser for Auth v3.00.1:
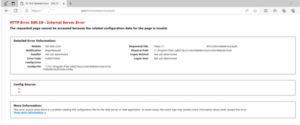
It could mean that .NET Core 3.1 has either not been installed or has been removed from the system. Ensure that the following has been installed:
If it has not been, go to this site: Download .NET Core 3.1 (Linux, macOS, and Windows) | .NET and download and install the Windows Hosting Bundle for ASP.NET Core Runtime 3.1.32.
How to Disable Auth
If you lose connectivity to your external authentication provider or simply need to turn off Auth in order to revert back to using Windows Authentication, the following steps can assist you in doing this.
When Auth was configured to communicate with Crossfire, the tool called EncryptAuthInfo.exe. This tool encrypts the required configuration values needed by Crossfire and stores them in a file. By renaming this file, we can “disable” the usage of Auth.
NOTE: Ensure that you have an operator that corresponds to the currently logged in userʼs Windows account before performing these steps and that operator is enabled and possesses the proper privileges.
To temporarily disable Auth:
- Close all running Clients.
- Stop Crossfire.
- Navigate to this folder: %ProgramData%\Tyco\XFire\ Example: “C:\ProgramData\Tyco\Xfire\”
- Rename the XFAuth.xml file to XFAuthTemp.xml (or anything other than XFAuth.xml)
NOTE: Do NOT modify any other files found in this folder. Modifying these files can cause your C•CURE system to become inoperable.
5. Start Crossfire.
6. Launch Admin or Monitoring station. You should now be logged in with your Windows account operator, assuming an operator exists for the currently logged in Windows User.
To reenable using Auth:
- Close all running clients.
- Stop Crossfire.
- Navigate to this folder: %ProgramData%\Tyco\XFire\
- Example: “C:\ProgramData\Tyco\Xfire\”
- Rename XFAuthTemp.xml (or whatever else it was renamed to) back to XFAuth.xml.
- Start Crossfire.
- Launch Admin or Monitoring station. You should now be prompted to log in to Auth, assuming you have at least one enabled basic operator.
NOTE: Should this file be deleted or become corrupted, it can be recreated by running EncryptAuthIInfo.exe and providing the required values.
C•CURE Operators vs Auth Users
There is a relationship between operators in C•CURE 9000 and users in Auth but they are not one in the same. Some operators are not Auth users, and some Auth users are not operators. Consider the following:
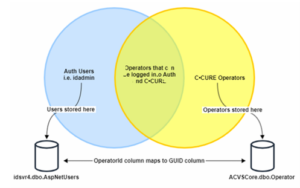
This diagram shows the relationship between Auth users and C•CURE Operators. The joining section is where an operator is migrated to an Auth user and a user can login to Auth with that operator.
NOTE: The Auth user idadmin is NOT in the joining section of the diagram and although it can be used to log into Auth (whether in the browser when accessing the Auth URL or in the embedded login screen when attempting to log into Admin or Monitoring Station), it cannot be used to log into any C•CURE client since it is not associated with a C•CURE operator and is therefore unknown to Crossfire.
For troubleshooting purposes, you can execute the following SQL script to find the union between Auth users and C•CURE operators.:
SELECT


    A.UserName


    , A.Email


    , A.WindowsIdentity


    , A.OperatorId


    , O.GUID


    , O.ObjectID


    , O.Name


    , O.OauthID


    , O.Enabled


FROM idsvr4.dbo.AspNetUsers A


LEFT JOIN ACVSCore.dbo.Operator O


ON A.OperatorId = O.GUID


UNION


SELECT


    A2.UserName


    , A2.Email


    , A2.WindowsIdentity


    , A2.OperatorId


    , O2.GUID


    , O2.ObjectID


    , O2.Name


    , O2.OauthID


    , O2.Enabled


FROM ACVSCore.dbo.Operator O2


LEFT JOIN idsvr4.dbo.AspNetUsers A2


ON A2.OperatorId = O2.GUID


WHERE O2.WindowsPrincipal NOT LIKE '%\%'


OR O2.Password IS NOT NULL
Your results will look like this:

Here you can see the first 3 rows represent C•CURE basic operators that DO NOT have a matching Auth user and then rows 4, 5 and 7 represent operators who DO have a matching Auth user. Row 6 represents the Auth administrative user “idadmin”, which will never have a matching C•CURE operator as shown in the Venn diagram above.
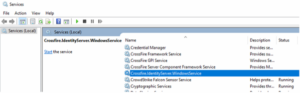
Ensure that the Auth Windows Service is running
For C•CURE v3.10 and later, Auth no longer runs under IIS but under Kestrel within a Windows Service. Ensure that the following Windows Service is running:
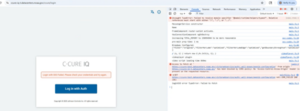
Blank Login page when trying to sign into Admin or Monitor Workstations using Auth
NOTE: This happens when SSL Certificate use in the IIS Web site hosting does not contain the certificate extension “Subject Alternative Name” with the DNS Name of the Full computer name, which is used for validation. This issue has been resolved with the installer but is here for posterity.
- Verify that the https binding of the IIS website in which Auth is being hosted, uses a valid certificate, that contains the extension “Subject Alterative Name” and that the DNS Name property have assigned the Full Computer Name.
- If the certificate does not have that extension, create a new certificate with that information.
This certificate can be created with PowerShell using the following command:
NOTE: Make sure to modify the variable $ FullComputerName with the FQDN of your VM, this can be found in the System Info tab in the control panel. The certificate password is “Monday123!” by default, but the user can change it if needed.
$password = ConvertTo-SecureString -String 'Monday123!' -Force -AsplainText

## this can be changed, but not needed.

$FullComputerName = '{Full-Computer-Name}'

## this need to be updated with the FQDN

$certificateName = 'SelfSignedAuthCertificate'

## display name of the certificate

$DesktopPath = [Environment]::GetFolderPath("Desktop")

$pfxFilePath = $DesktopPath+ '\AuthCert.pfx'

## path for the pfx file of the created certificate.

## create a new digital certificate and add it to the Personal localmachine certificate store, so thatcan be access from IIS

$certficate = New-SelfSignedCertificate -DnsName $FullComputerName -FriendlyName $certificateName -CertStoreLocation Cert:\LocalMachine\My

## get the virtual path of the peviously created certificate.

$certificatePath = 'Cert:\LocalMachine\My\' + $certficate.Thumbprint

## export certificate into a pfx file.

Export-PfxCertificate -Cert $certificatePath -FilePath $pfxFilePath -Password $password
NOTE: The previous command creates a AuthCert.pfx file for the certificate and place it in the desktop.
Double click the certificate generated (it is in the desktop) by the previous command and install it in the local machine trusted root certificate store.
NOTE: When installing the certificate, you will be asked for a password, this will be the password used to generate the PFX file in the step two.
Crossfire fails to validate client tokens with a SecurityTokenSignatureKeyNotFoundException
If you see an error like this:

You can fix it by deleting contents of idsvr4.dbo.DataProtectionKeys and restarting everything (at least auth and CrossFire).
If it is in 3.00.x and you see an error like this:

Make sure that the Issuer Signing Certificate provided in the EncryptAuthInfo tool matches the appsettings.json variable: AUTH_SIGNING_CERT

Workaround: User is unable to login to Admin workstation via SSO/Auth due to enables basic operators without OauthID
This scenario usually can occur when (1) the user installs SSO/Auth separate from the rest of the products or (2) when the user has installed SSO/Auth normally and logs out of the windows operator before creating an OauthID operator or user creates one without an OauthID.
The solution is to create a ‘temp’ oauth operator to login then create another correct operator. We accomplish this by creating a new basic operator in admin workstation and adding an oauthid to it, then inserting a new AspNetUsers table entry to match this operator.
- Disable Crossfire Auth integration in the Server Configuration App → Settings → Disable
- Login to Admin workstation as windows operator, create a new basic operator OR make a note of the basic operator you want to use for auth, make sure its password is EXACTLY the same as the Idadmin auth user account.
- Open SSMS (SQL Server Management Studio) then go to the acvs core database then select top 1000 rows on the dbo.operator table.
- Run the query below:
UPDATE [ACVSCore].[dbo].[Operator]

SET [OauthID] = 'oauth_as_email'

WHERE [ObjectID] = 'operator_object_id'
Line 2: replace ‘oauth_as_email’ with an email (ie: ‘test@testmail.com’)
Line 3: replace ‘operator_object_id’ with the operator’s ID that you want to change to an Oauth basic operator
- Open the idsvr4 database, then go to AspNetUsers table then select top 1000 rows
- Run the query below:
USE [idsvr4]
GO

INSERT INTO [dbo].[AspNetUsers]
(
[Id]
,[UserName]
,[NormalizedUserName]
,[Email]
,[NormalizedEmail]
,[EmailConfirmed]
,[PasswordHash]
,[SecurityStamp]
,[ConcurrencyStamp]
,[PhoneNumber]
,[PhoneNumberConfirmed]
,[TwoFactorEnabled]
,[LockoutEnd]
,[LockoutEnabled]
,[AccessFailedCount]
,[OperatorId]
,[WindowsIdentity]
,[PersonnelId]
)
VALUES
(
NEWID()
,'mars_global'
,'MARS_GLOBAL'
,'mars@test.com'
,'MARS@TEST.COM'
,0
,'AQAAAAIAAYagAAAAEGtsAp7MvH8aRz7qwAPfWzog21Q3I+QY4EYiQDjlcQ21P/n0Yj5HN1+
cB+kSdM+zFw=='
,NEWID()
,NEWID()
,NULL
,0
,0
,NULL
,0
,0
,'B00D19FE-0D31-413C-82D3-4F4B85106D79'
,'MARS_GLOBAL'
,NULL
);
Line 28: replace ‘mars_global’ with the name of your operator in lowercase
Line 29: replace ‘MARS_GLOBAL’ with the name of your operator in uppercase
Line 30: replace ‘mars@test.com’ with the OauthID of your operator in lowercase
Line 31: replace ‘MARS@TEST.COM’ with OauthID of your operator in uppercase
Line 33: replace ‘AQAAAAIAAYag…’ with the password hash of the Idadmin account in the AspNetUsers table for simplicity (we can change this later but for now it allows us to use the same password for the initial login)
Line 42: replace ‘B00D19FE-0D31-413C-82D3-4F4B85106D79’ with Corresponding OperatorID FROM dbo.Operator in the Acvs Core database.
Line 43: replace ‘MARS_GLOBAL’ with the uppercase version of your operator.
NOTE: Keep all other lines of this Query EXACTLY the same except for the ones mentioned above.
7.Re-enable crossfire/auth integration and try logging into the auth homepage and the admin workstation via SSO embedded browser.
Your newly created auth operator should both work if these steps were followed correctly. Make sure to create a new auth operator at this point then logout of the temp operator and disable it.
This can be used in enterprise as well, however the operator created by this workaround may not trigger a notification from the MAS to the SAS (this means that the SAS may not be able to login to its auth service since it was created via SQL and will not be notified). Steps 1 through 7 are to be done on a MAS and once done, the user should login as this user then create another auth operator in the global partition.
Error: “MAS/SAS/Standalone DNS Alias has been blocked by CORS policy: No ‘Access-Control-Allow-Origin’ present on the requested resource”
This error happens when the C•CURE IQ Web Client URL is not configured correctly in the idsvr4 Client CORS Origin table.

- Recreate the URL Redirect for the AUTH service on the CCURE-IQ server.
- Perform the steps below on the AUTH web sever and MAS idsvr4 database:
- Edit the dbo.ClientCorsOrigins table and make sure the correct ALIAS of the CCURE-IQ Server is added, with ClientID = 3
- Edit the dbo.ClientRedirectUris table and make sure the correct ALIAS of the CCURE-IQ Server is added, with ClientID = 3
- Restart the AUTH App Pool.
Auth fails to start with a certificate error
If Auth application pool starts but when navigating to the auth home page you see the following error:
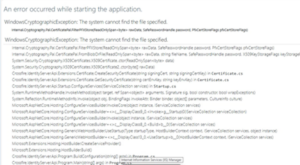
First verify that the AUTH_SIGNING_KEY in the appsettings.json contains the signing certificate enconded as base64 string.
AppSettings.json can be found under “Tyco\victorWebService\victorWebsite\auth”
NOTE: This is done by default on the installer, if that is missing it means that the installation failed or something else modified the appsettings.json.
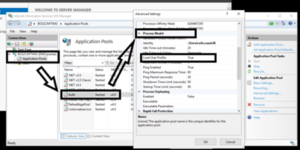
If the service exists and seems to be in the correct format, check the IIS Application Pool settings and enable the option “Load User Profile”.
To do that, go to IIS > open the Application Pools menu > select the Auth Application Pool > Go to the “Process Model“ section > Set the “Load User Profile“ option to true.