Article ID: SWH-KB-000037360
Published: 27/01/2025
If the site has an SQL Support Team, please ask them to perform this task. If no SQL IT support is available, you can follow the steps below. This should only be completed by an SQL Administrator familiar with MS SQL Server.
Summary
NOTE: This document does NOT cover the checkbox to “Encrypt the Connection Strings”. Encrypting the Strings only encrypts the text of the string in the configuration file. On the other hand, this document covers encrypting the communication between C•CURE 9000 Services and the MS SQL Server.
This document will cover the steps needed to ensure that the communication between MS SQL Server and the C•CURE 9000 services are encrypted.
The first step is to reconfigure C•CURE 9000’s connection strings via the .config file. This will tell the services to connect with encryption and to trust the built-in server certificate. Do not make the change in the Server Configuration Application as it does not always show all the connection strings.
NOTE: This step does not encrypt anything else such as Databases, Files, logs, connection strings, etc. This only forces C•CURE 9000 to encrypt the communication between C•CURE 9000 and SQL.
Steps
- As with any install, upgrade, configuration file changes, etc. Log in as the C•CURE 9000 Service account. The account should have full Administrator access to the C•CURE 9000 Application Server OS, and to the SQL Server.
- Verify you have a good recent back up of databases (we are not doing DB modifications, but this is always a good thing to do before any changes.)
- Shut down all C•CURE 9000 services.
- The file we will be working with is “SofwareHouse.CrossFire.Server.exe.config”. The default location is “C:\Program Files (x86)\Tyco\CrossFire”.
- Make a copy of the file for backup purposes.
- Locate the <configuration/connectionStrings> section in the “SoftwareHouse.CrossFire.Server.exe.config” file.
- Modify each connectionString:
- To the end of each connectionString, add ;Encrypt=true;TrustServerCertificate=true
- To the end of each connectionString, add ;Encrypt=true;TrustServerCertificate=true
“SoftwareHouse.CrossFire.Server.exe.config” before changes:

“SoftwareHouse.CrossFire.Server.exe.config” after changes:

8. Save the file and you can start the C•CURE 9000 services as normal.
9. Verify the connections are encrypted by using SSMS:
a. “SELECT DEC.session_id, DEC.auth_scheme, DES.login_name, DEC.encrypt_option FROM sys.dm_exec_sessions AS DES JOIN sys.dm_exec_connections AS DEC ON DEC.session_id = DES.session_id;”
b. The encrypt_option column would show TRUE for encrypted connections to SQL.
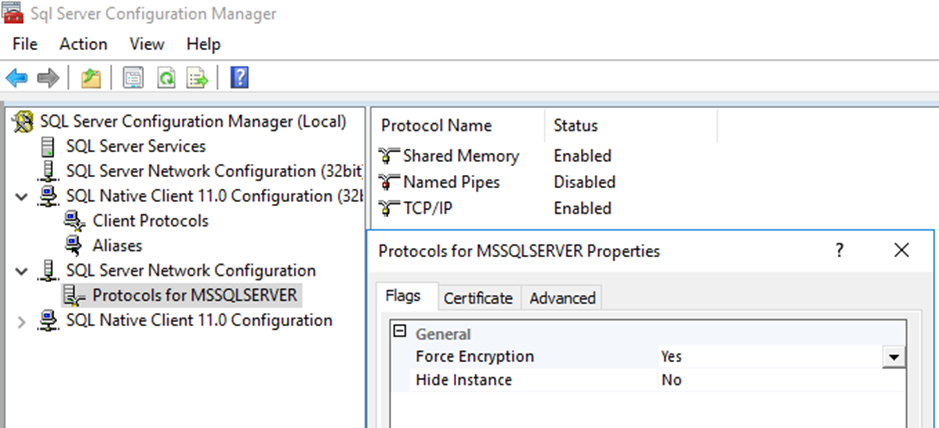
Optional Steps
The second step (optional) is to configure the MS SQL Server to force connection encryption. By default, MS SQL Server will accept either encrypted or non-encrypted connections. This will require all connections to SQL Server to use Encryption. If enabled, encryption is not used the application connecting will get an error.